
Instructions for building a manifold for evacuating vials.
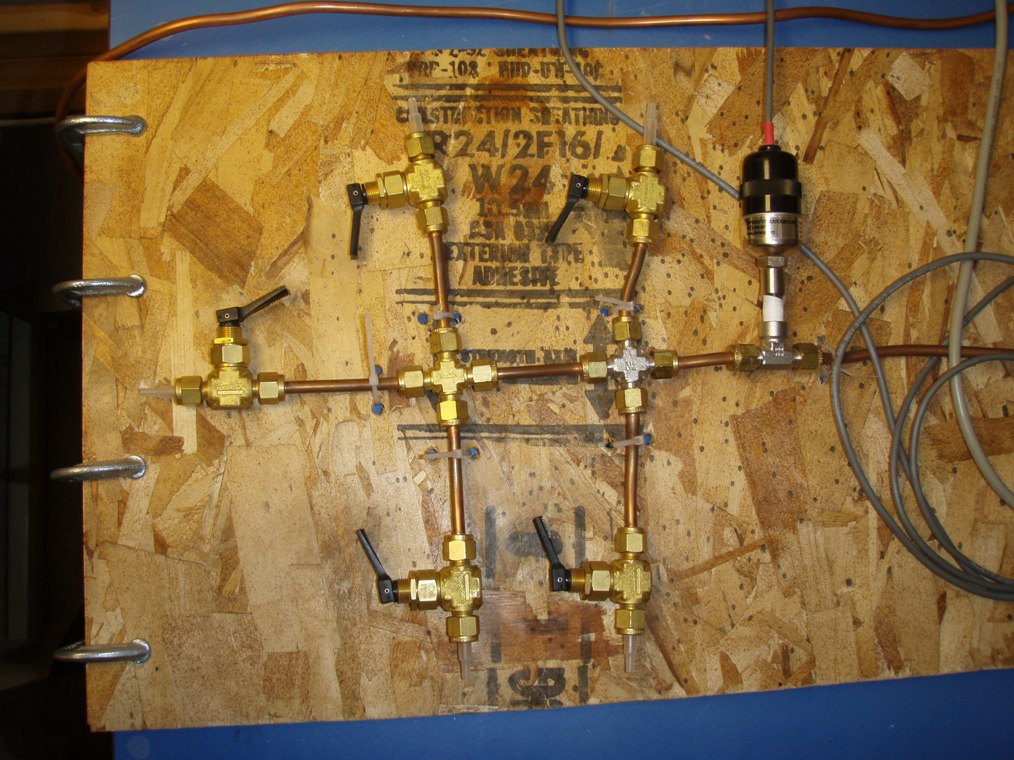
This shows the layout of the manifold itself. The valves are 1/4″ Swage toggle valves. The connection to needles is via 1ml plastic syringes. The barrel of the syringes might be slightly larger OD than the ID of the ferrules, but if you’re careful you can pound the syringe barrels into the ferrules and shave the outside of the syringe off in the process. The right side of the photo is toward the vacuum pump. Note that the pressure gauge connects on this “upstream” side of the manifold.
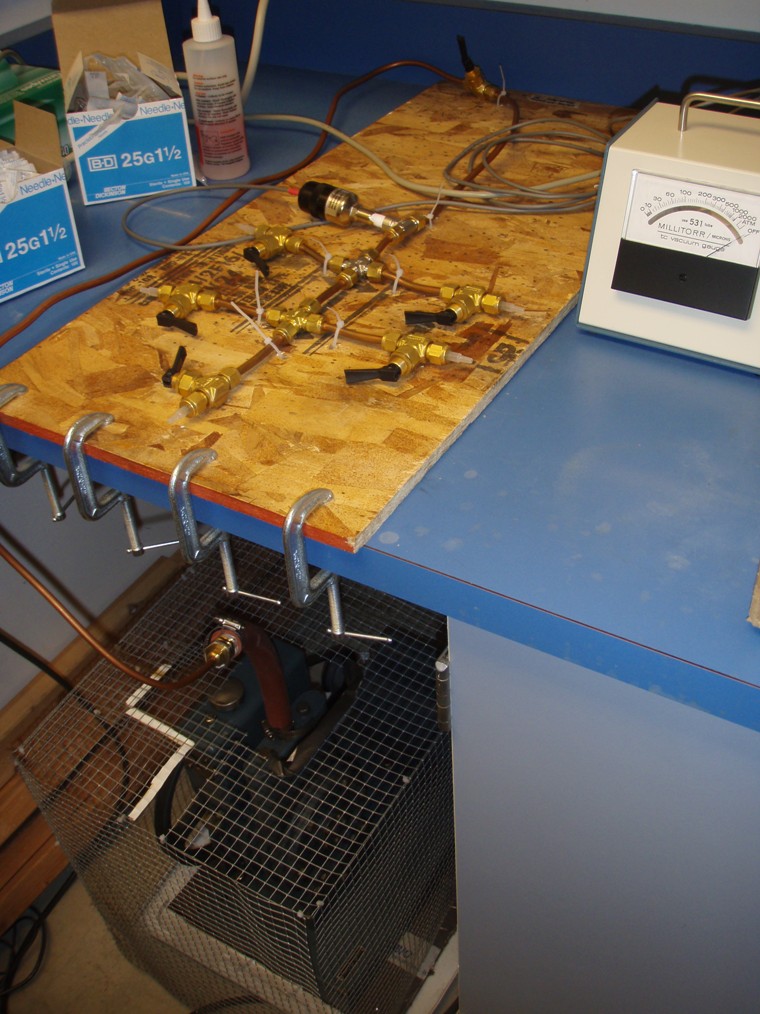
We have the manifold mounted to a piece of chip board. We drilled holes in the board and mounted the manifold to the board using cable ties. If the tubing wiggles, it can leak.
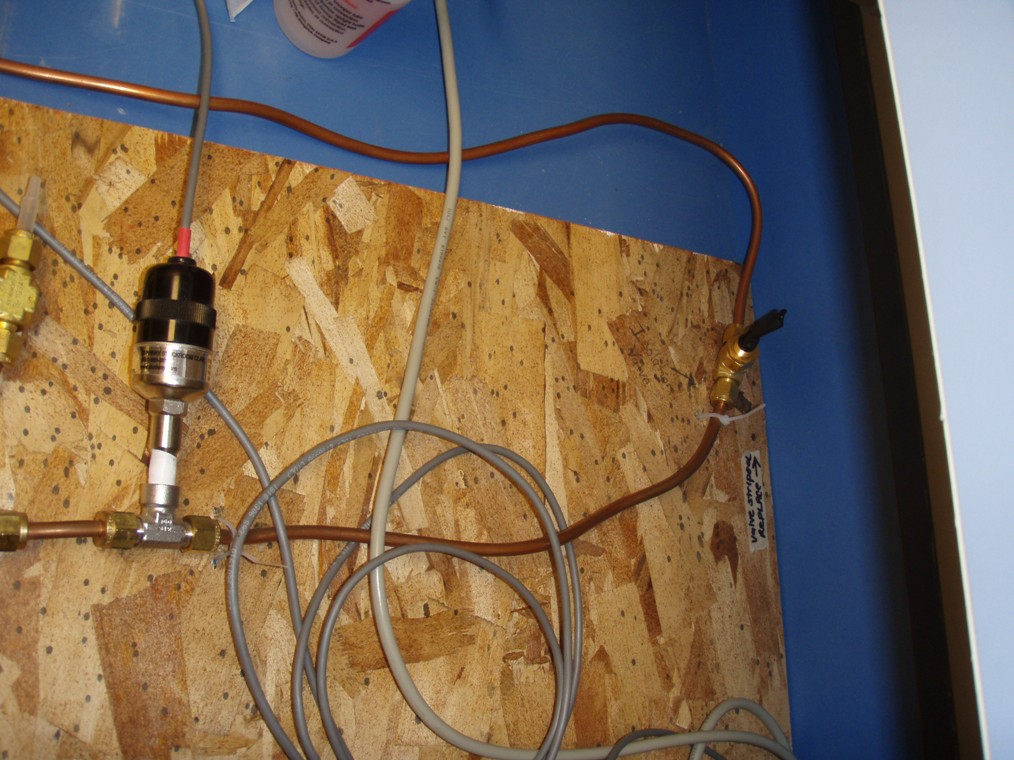
This shows that at the top of the photo we add a valve between the manifold and the pump. This “isolation valve” allows us to test for leaks.
We bought our vacuum gauge from Duniway (phone = 650-969-8811). We use a #531 vacuum sensor and an analog meter to read out the pressure #TCG-531. When you call Duniway, make sure to find out what the fitting size is on the sensor so you can connect it to the evacuation manifold that you’re building. I think the connection is male 1/8″ NPT, so you’ll need to get a T-shaped Swagelok connection that has 1/4″ swage on the opposite ends, and female 1/8″ NPT in the middle.
We use a Welch vacuum pump, similar to model 8907 or 8912. The minimum pressure is approximately 1e-4 Torr. The differences are in the flow rate (cubic feet per minute, or cfm). Faster flow rates will help evacuate vials faster, but choose a cheaper one if budget is constraining. If you want me to just pick one, I’d suggest 8907A ($1585 at CSU pricing). You can also ask the sales rep if there is an equivalent sort of one by Edwards or FisherBrand that might be cheaper.
You’ll need to speak with a customer sales rep to buy the appropriate fittings. There should be some vacuum fittings that will go from a flanged seal down to something that you can seal with a swagelok seal. Vacuum systems evacuate faster with wider-bore tubing, but the wide boar can be hard to work with. I built mine out of 1/4 inch copper tubing. You can get that in 50′ spools at Ace Hardware.
During construction, I strongly suggest building the unit stepwise from the pump out toward the manifold. There are about 24 joints in this system, and without a systematic approach, it can be maddening to find the source of leaks. Connect the pump directly to the vacuum gauge and see what it does. Then add the isolation valve and see if the connection to the vacuum gauge leaks. Then add the first swage union, and test it and so on. When you order Swage parts, you can get 1/4″ caps to seal up connections. These caps seal easily, allowing you to isolate the possible source of leaks. If you don’t have a lot of experience making seals with Swagelok fittings, feel free to call. The rule of thumb is, when making a new seal with Swage, to wrench tighten 1 1/4 times around past finger tight. When you re-seat a fitting, you should only need to go 1/4 turn past finger tight.
From your swagelok supplier, you can order 1/4″ brass nuts and ferrules. You’ll also need 6 toggle valves that have 1/4″ Swage connections.
We use 10ml wheaton vials with a 20mm opening. I believe this is Wheaton number 223739. You will also need aluminum crimp tops, a crimper (tool to squeeze the crimp over the septum) and a crimp top remover. I think you can get these latter two tools from Alltech, which was recently purchased by Grace Davison http://www.discoverysciences.com/Product_home.aspx
We buy our septa from GeoMicrobial Technologies, 918-535-2281.
Instructions for evacuating gas sample vials
1) Turn on pump and check to make sure the pump oil level is within the window. Oil level comes up after turning the pump on. Sometimes the pump cannot turn over and the motor circuit trips. In such case, unplug the power strip, manually turn the pump wheel past the sticking point, and turn the pump on. Run the pump for about 10 minutes. The pressure should fall to or below 160 miliTorr.
2) Close off manifold for 1 minute by closing the “isolation valve” on the end of the manifold near the pump. Pressure should not increase more than 20 miliTorr. If it does, water vapor may still be present on the walls of the tubing. Evacuate an additional 10 minutes and check again. If the leak persists, contact Joe or Anita to fix the leak. Note that over tightening of the swagelok fittings can cause leaks and permanently damage the fittings.
3) Put the 25 guage needles on luer slip connections as tightly as you can. It may help to twist it on while the cap is on. Each person should use their own needles. Each needle can be used about 1 to 2 times, before replacing. Remember to cap all used needles and put them into a designated sharps container.
4) Check to make sure there is no leak from each needle every time you put on a new vial. Push the vial part way onto the needle so that the end of the needle is buried in the septum. Open the valve and look for the pressure to stabilize near the same level as the warm-up period (about 160 miliTorr). Close the isolation valve and make sure that the pressure does not rise more than 40 miliTorr in 30 seconds. If the pressure increase is greater than that, push the needle on more firmly and repeat the test.
5) Once all needles are checked and all are part-way embedded into the septa of all 5 vials, open all the port valves (letter designated A-E) and begin evacuation of the vials. Evacuate until the pressure is below 200 miliTorr. This should take about 5 to 6 minutes.
6) One by one, remove the vials from the needles. Firmly grip both the needle and the vial and pull the vial back until the needle is at the very end of the septum. Close the valve and quickly pull the vial from the needle. Repeat this procedure for each vial, making sure excess air isn’t introduced-(pressure should go down below 200 miliTorr). Note that when the air leaks from the needle (due to the open evacuation valve) all remaining vials will take on air and the evacuation must be repeated for those vials (below 200 miliTorr).
7) Turn off the pump and clean up. Make sure that all needles are properly disposed of in sharps container.